Free Online Editing Guide
How to Adjust Video Brightness Online Free (Step by Step)
This guide shows how to lift dark or flat footage in VidTL, right in your browser. You will learn where to click, how far to move the brightness slider, and how to keep skin tones and backgrounds from washing out.
Brightness checklist
- Watch faces first, then backgrounds
- Check white areas for detail loss
- Stop before skin looks pale or gray
- Balance with a slight contrast increase
- Preview the full clip before export
Fast recap
- Import the clip and select it on the timeline
- Open the Effects panel and apply Color Correction
- Increase brightness in small increments
- Add contrast to restore depth
- Preview and export as MP4
What adjusting brightness improves
Brightness is one of the fastest fixes for underexposed or dull footage. A good lift lets viewers see faces, details, and movement without squinting or turning up their screen. It also makes the video look cleaner right away.
Most dark clips need two things: a brightness lift and a small contrast adjustment. Raising brightness alone can make the image look hazy. Pairing it with gentle contrast keeps depth in the shot while still revealing detail in the shadows.
When to increase brightness
- Indoor clips with weak lighting
- Backlit talking head videos
- Phone footage shot at night
- Screen recordings that look dim
When to stop
- Skin starts looking pale or gray
- White areas lose detail
- The image starts looking flat
- Noise becomes distracting
Step by step: adjust video brightness in VidTL
Follow these steps in order.
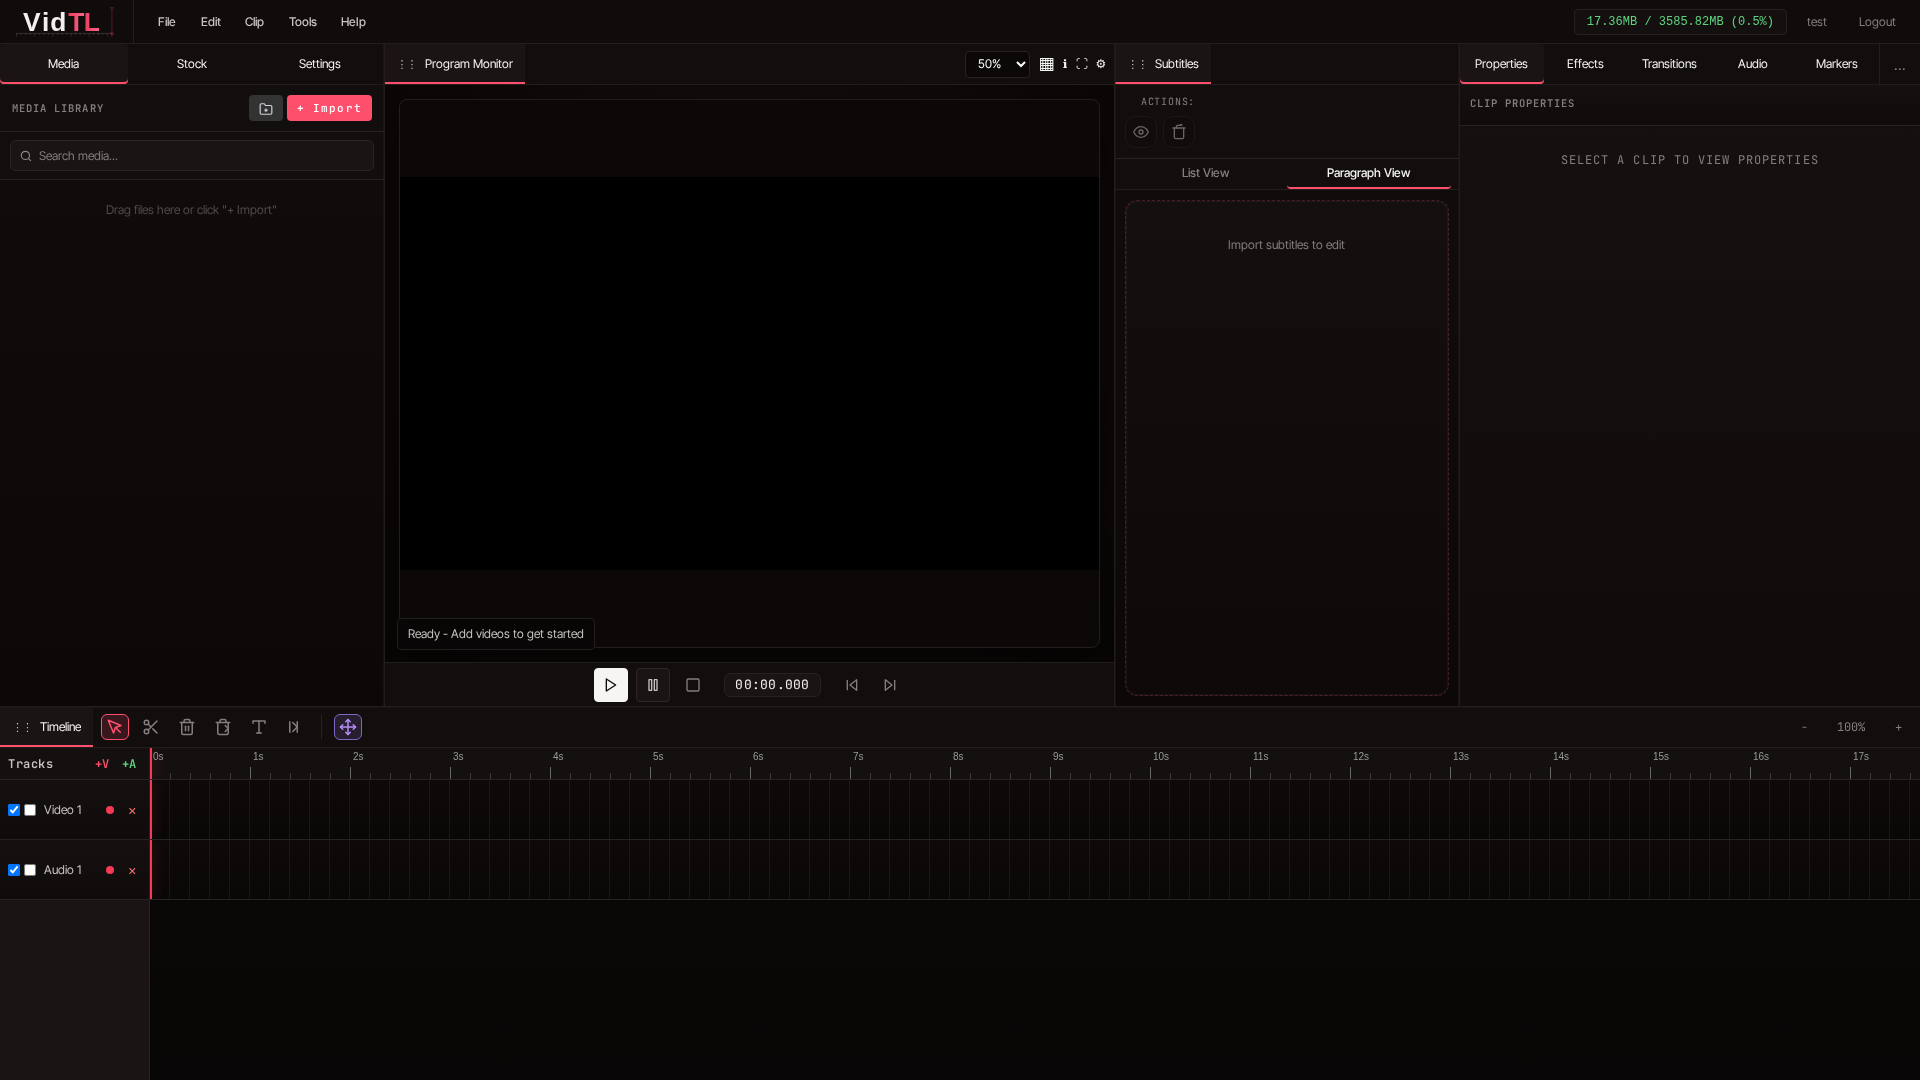
1. Open the editor and import your clip
Open VidTL and click the + Import button in the left Media panel. Once your file appears in the media library, drag it down to the timeline. If your clip has audio, it may appear on both video and audio tracks, which is normal.
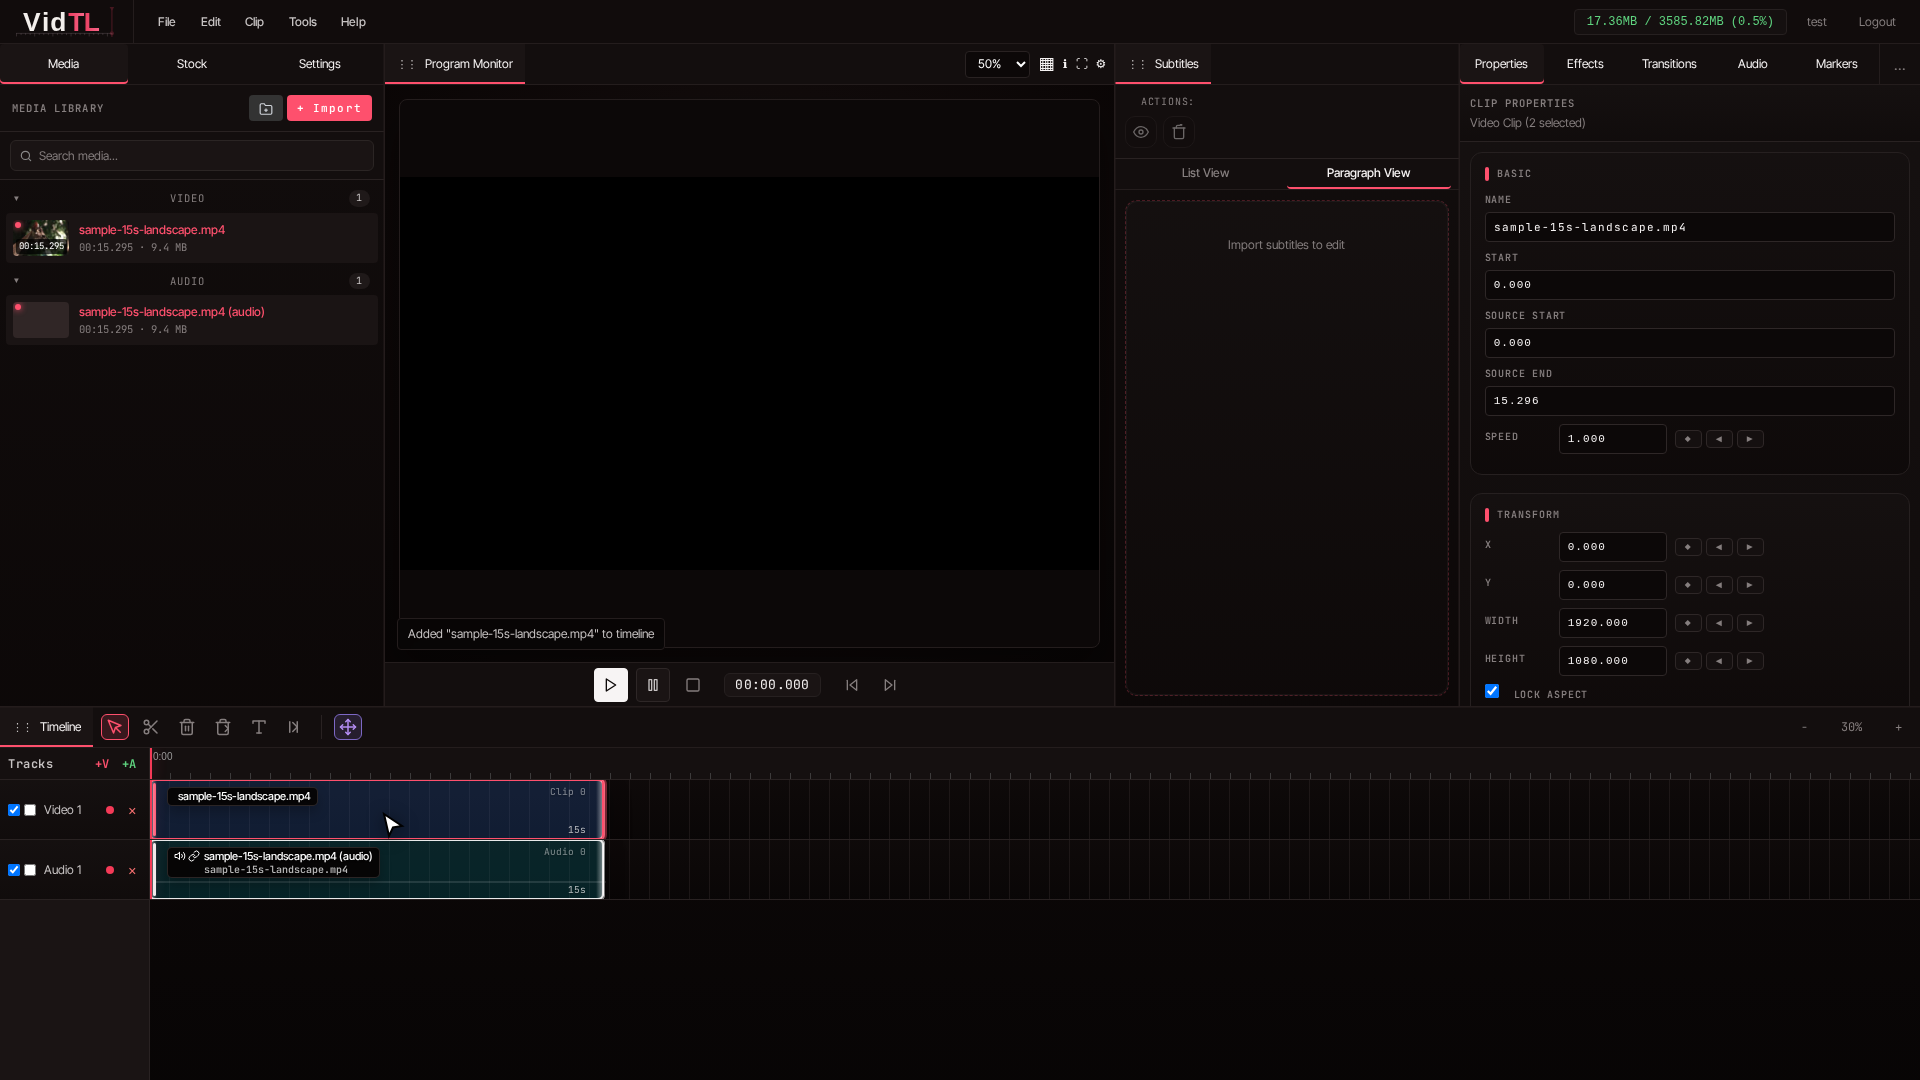
2. Select the clip on the timeline
Click the video clip in your timeline once. A selected clip is the one that receives your effect adjustments. If nothing seems to change later, the usual cause is that the clip was not selected before adjusting settings.
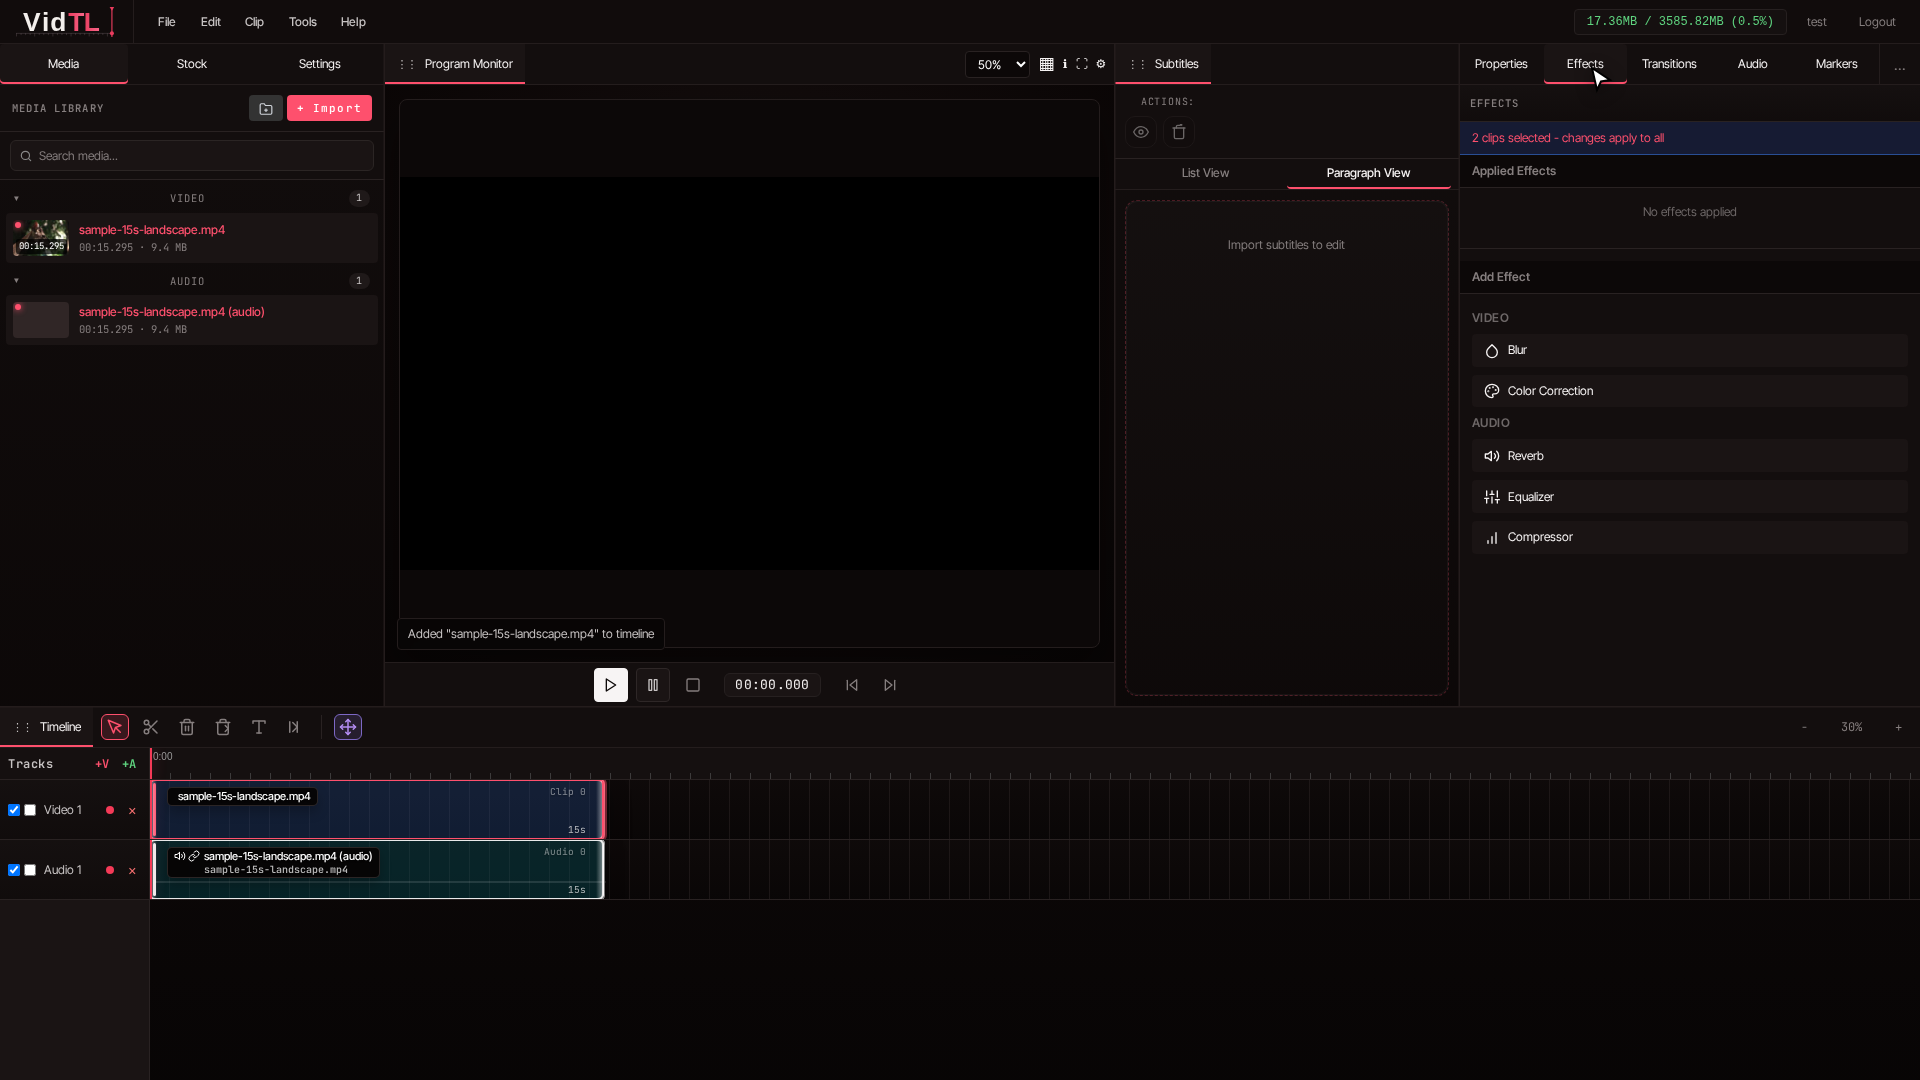
3. Open the Effects panel on the right side
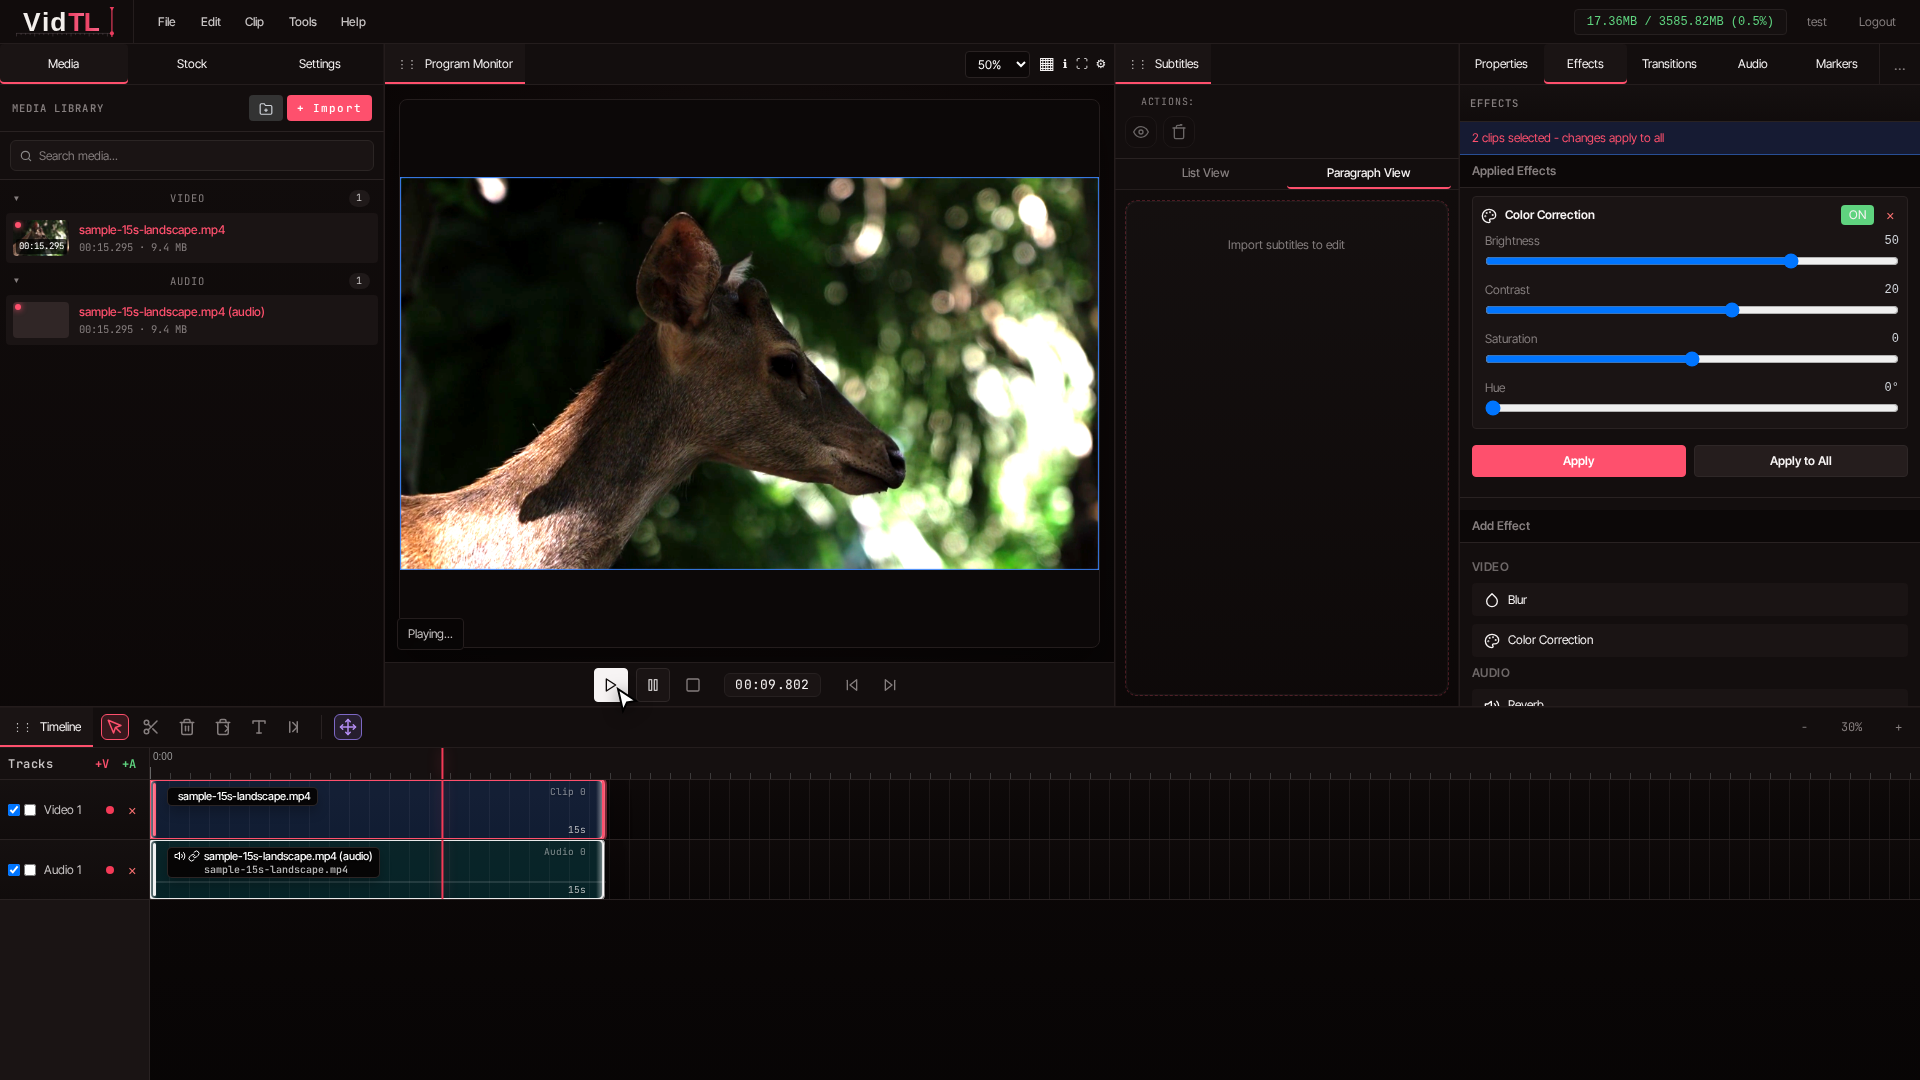
On the right sidebar, click Effects. This is where visual adjustments are controlled for the selected clip. Click and drag the "Color Correction" effect to your clip on the timeline. Keep your Program Monitor visible in the center so you can judge changes in real time while moving sliders.
4. Increase brightness in small increments
Move the brightness control a little at a time, then pause and look at the preview. Short adjustments followed by quick checks keep the image natural and prevent accidental over-editing.
- Start with a modest increase.
- Watch faces first, then backgrounds.
- Check white areas like walls, shirts, or sky.
- If everything looks faded, pull brightness back slightly.
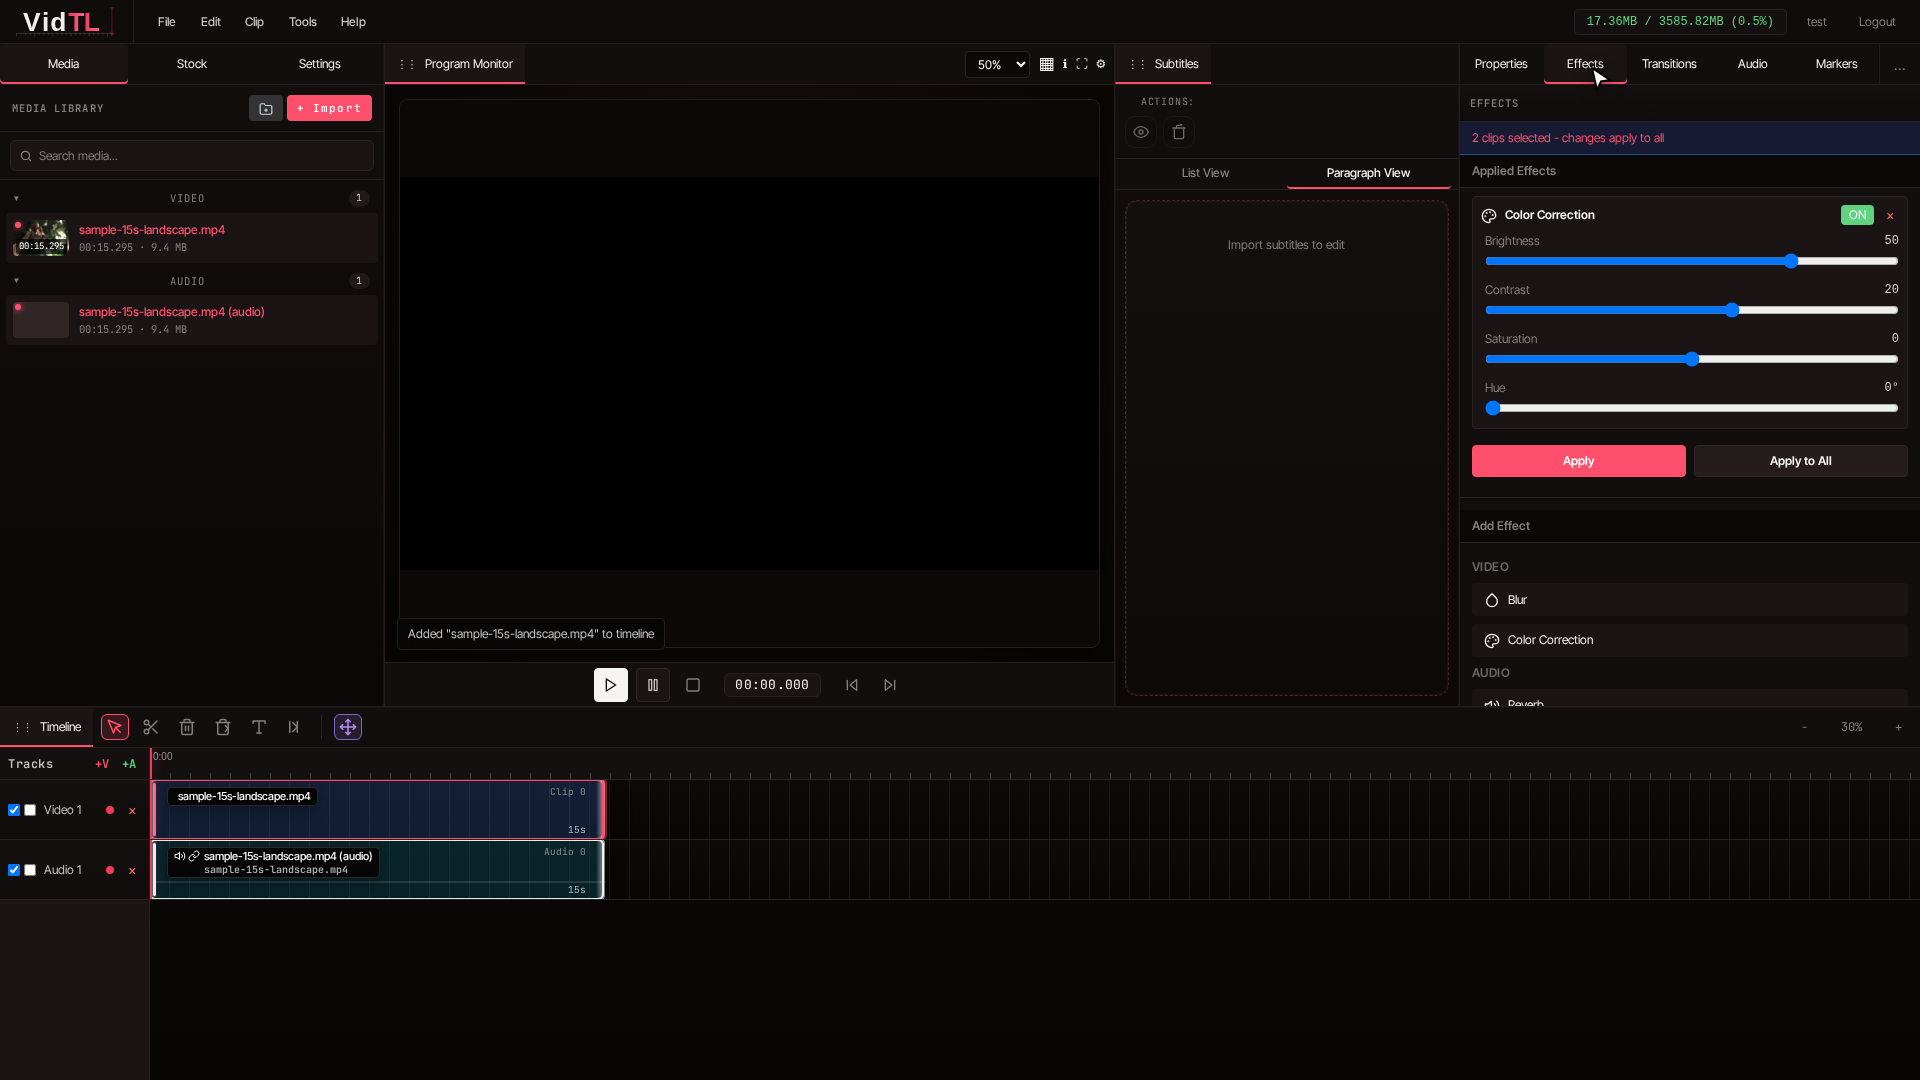
5. Balance with contrast so the image does not look washed out
After brightening, add a small contrast tweak to restore depth. In many clips, brightness alone lightens shadows but softens overall definition. A gentle contrast increase brings shape back into faces, clothing, and objects.
If you are editing talking head content, zoom your attention in this order: eyes, skin tone, then background. If eyes become too flat or skin loses tone, reduce either brightness or contrast by a tiny amount and preview again.
6. Preview from beginning to end before export
A setting that looks good in one frame may be too strong in another scene. Play through your clip in the Program Monitor and watch transitions between darker and brighter moments. Make micro-adjustments until the whole clip feels consistent.
7. Export your final video
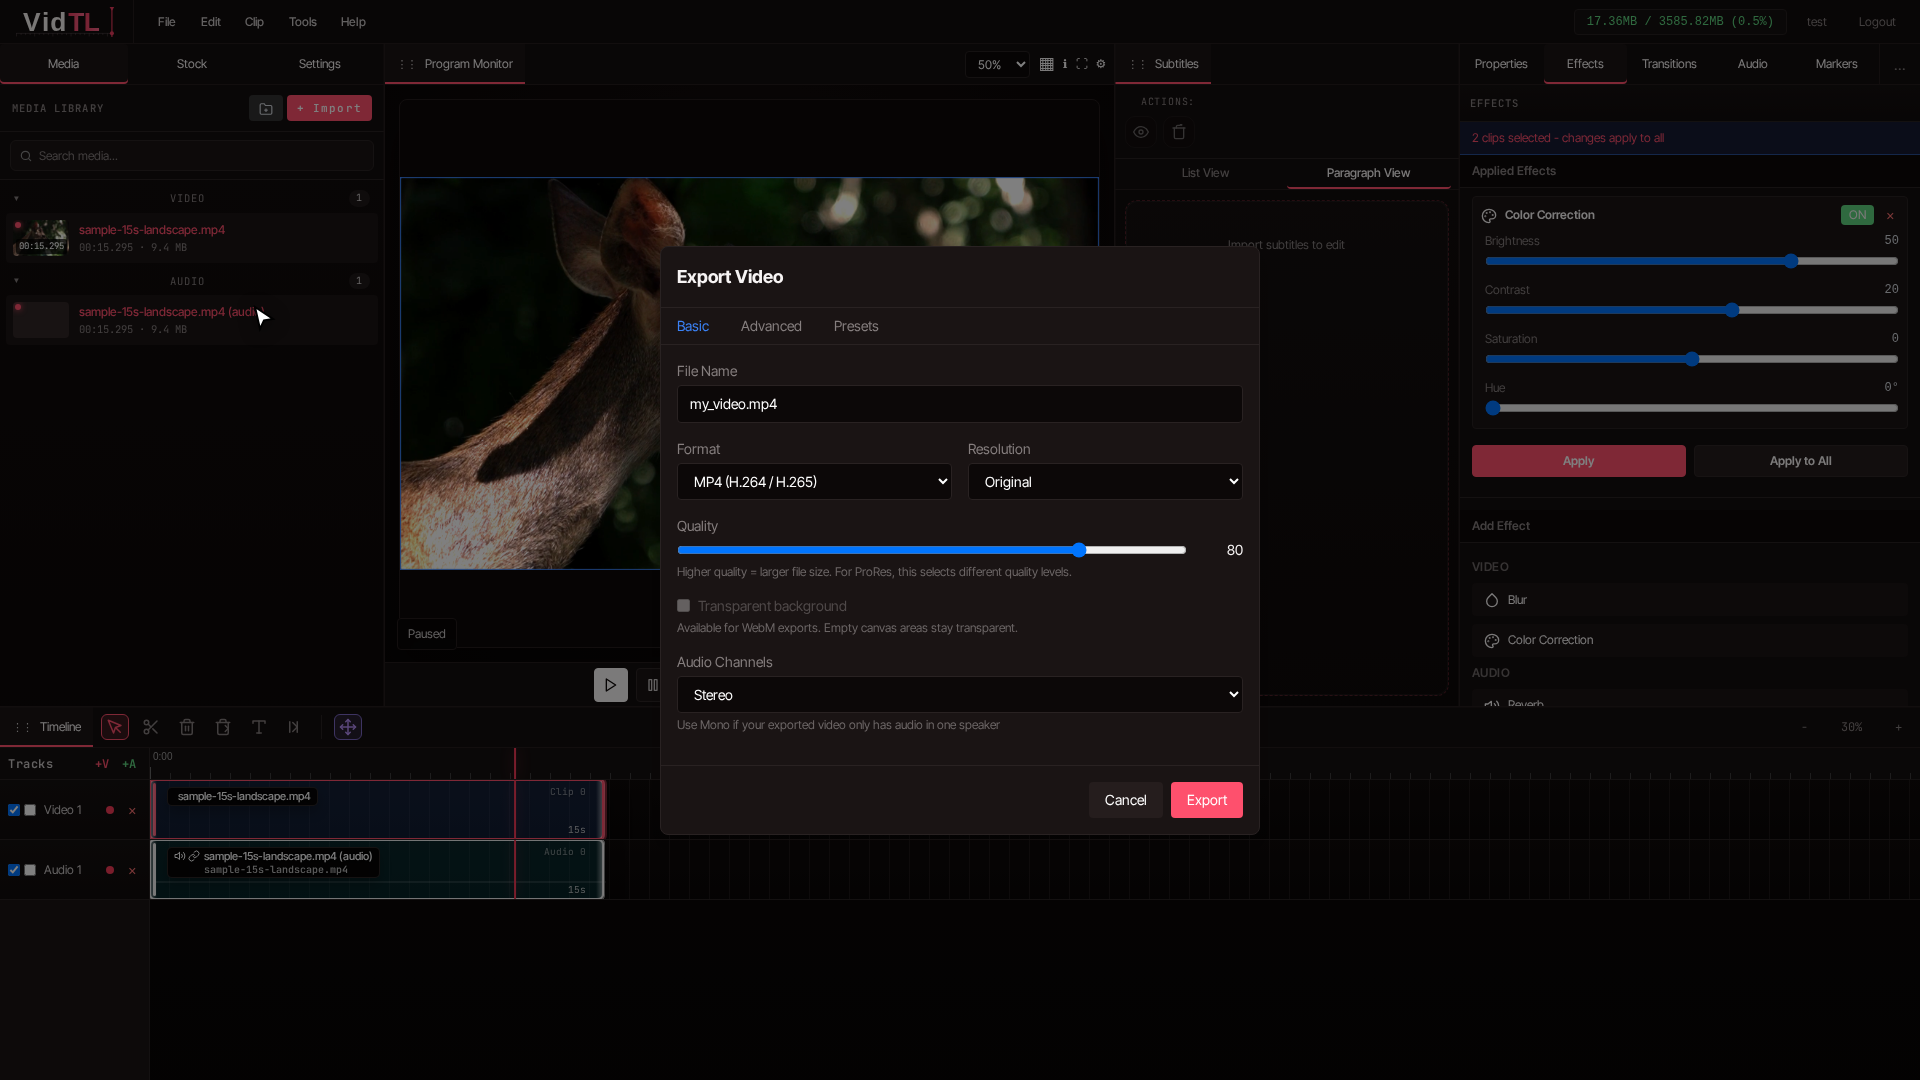
When everything looks right, export your video. Keep filename, format, and resolution aligned with where the video will be published. For most creators, MP4 at the target platform resolution is a practical default.
Recommended brightness workflow by clip type
Different footage needs different handling. The table below gives practical starting points; refine by eye in preview.
| Clip type | Brightness move | Contrast move | What to watch |
|---|---|---|---|
| Indoor vlog | Low to medium increase | Small increase | Skin tone and wall highlights |
| Night street footage | Small increase | Very small increase | Noise in shadows |
| Backlit interview | Medium increase | Small to medium increase | Face detail versus window clipping |
| Screen recording | Small increase | Small decrease or neutral | Text readability and UI detail |
If your clip still feels uneven after brightness correction, split long clips and tune each section separately. Lighting often changes during a recording, especially in moving shots or long talking segments.
Common brightness mistakes and quick fixes
Raising brightness too much
The video starts looking foggy, white, or lifeless. Reduce brightness slightly and add a small contrast increase.
Editing while paused on only one frame
Later scenes look too bright or too dark. Preview multiple points in the timeline before exporting.
Ignoring faces
The background looks good but people look flat. Prioritize skin tone and eye detail first.
Applying one setting to mixed lighting
Some parts are perfect, others overexposed. Split clips by scene and adjust separately.
Most creators get better results from three tiny adjustments than one large one.
FAQ: adjusting video brightness online for free
Can I adjust video brightness online free without installing software?
Yes. VidTL runs in your browser, so you can import, edit brightness, preview, and export from one place. You do not need desktop editing software just to fix dark footage.
Why does my video look washed out after increasing brightness?
That usually means brightness is too high for the clip. Pull brightness back a little and add a mild contrast increase. The goal is brighter detail with natural depth, not a flat image.
How do I make a dark video brighter without ruining quality?
Use small increments and preview often. Focus on faces and highlight detail as your quality checkpoint. Extreme boosts can reveal noise, so increase in stages and stop when detail looks clear.
What export settings should I use after brightness correction?
For most use cases, MP4 with your target resolution is a reliable choice. Keep quality reasonably high for cleaner gradients in bright areas, then test playback on phone and desktop before publishing.
Conclusion
If your main goal is to make dark footage easier to watch, adjusting brightness online for free is one of the highest impact editing skills you can pick up. With VidTL, the process is straightforward: import, select clip, open effects, add the color correction effect to your clip, nudge brightness, balance with contrast, preview, and export.
The key is restraint. Small controlled moves create a polished result that still looks natural. Once you get used to this workflow, you can fix dim clips in minutes and keep your videos clear and ready to publish.